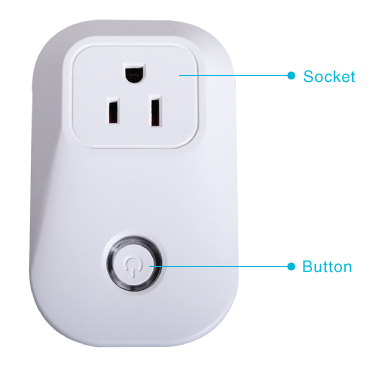
Red LED inside the button indicates on/off state of the socket.
Green LED inside of the button will flash when the ePlug is connecting to internet. LED will turn to steady on when the ePlug is connected to internet.
After the ePlug bound with an account, only the App logs on to that account, can control or read the ePlug.
Press the button over 10 seconds to unbind the ePlug with App’s account. Green LED inside of the button will flash every 3 seconds.
When ePlug unbound with App’s account, all the setting and power usage data in the ePlug will be cleared. And then, other App’s account can bind with ePlug.
Start to use:
step 1
Download BTC ePlug App.
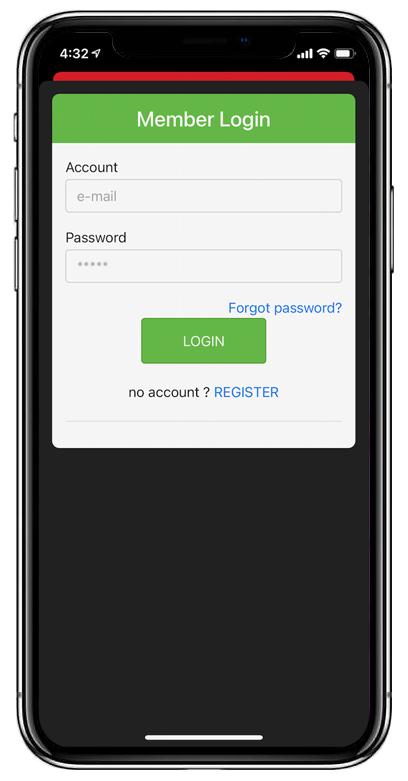
When you open the app, you'll see a sign-in page, enter your account , password, and then click the [LOGIN] button to sign in to your member's account.
If you don't have an account, click [REGISTER] and sign up for it.
When the sign-in is successful, the app goes to the Device List page.
Click on [Device] to go to the Scan Devices page.
step 2
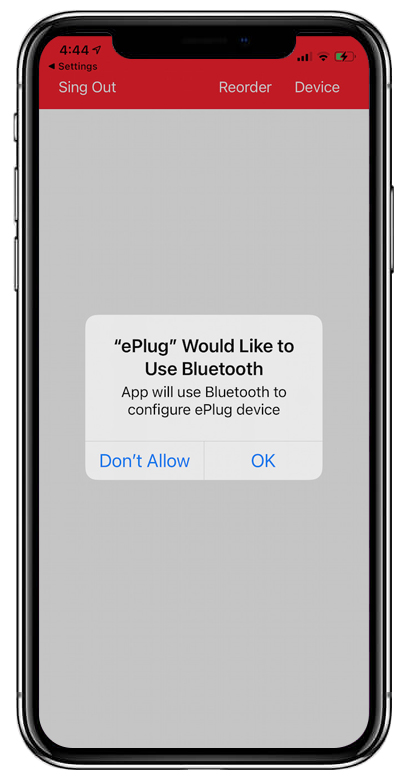
When the App show “ePlug would like to Use Bluetooth”, Click OK.
The App will use Bluetooth to configure ePlug device.
step 3
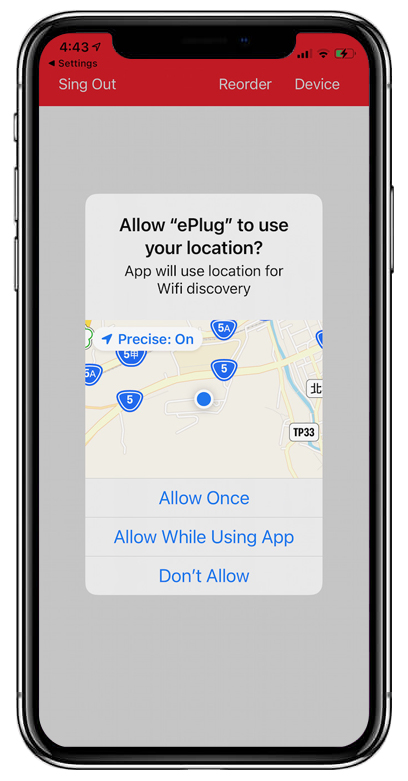
When the App show “Allow ePlug to your location ?”, Click “Allow While Using App”
The App will use location for Wifi discovery.
step 4
The app scans all nearby ePlug devices and lists them. Click an "ePlug" device from the list, and then enter the Device Settings page.
step 5
The name field displays the default device name, which can be modified.
Enter the wireless network SSID and its password. If you click the Wifi button, app will copy the wireless network SSID, linked to your phone, to the SSID field.
Click on [Write to ePlug] and, upon confirmation, the app will send the information to the device.
At this point, the account is bound to the device. When the setup is complete, the app displays a set-up completion message.
In the device connection, the green LED of the button flashes. When the device is connected to network, the green LED is constantly lit.
Click on [Done] and go back to the Device List page to get started.
Description
Sign in
When you open the app, you'll see a sign in page, please enter your account name, password, and then click the [LOGIN] button to log in to your member's account.
If you don't al have an account, click [REGISTER] and sign up for it.
When the sign-in is successful, the app goes to the Device List page.
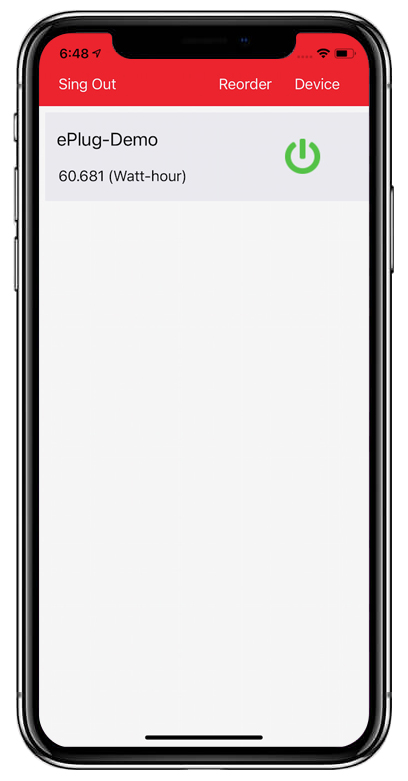
Device list
This page lists all devices bound to this account.
And show the electricity usage data of each device, and the status of the socket switch.
In the list, select and tap a device to go to the Device Status page.
Click on [Device] to go to the Scan Devices page. Click [Reorder] to adjust the order of the devices. Click on [Sign Out] to sign out of this member account upon confirmation.
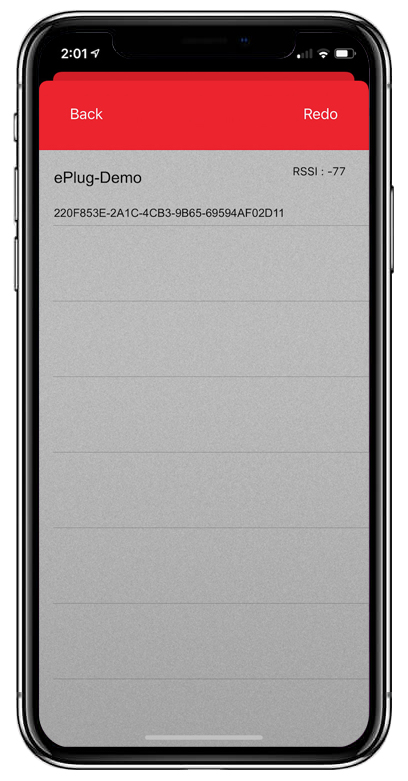
Scan Device
The app scans with BLE and lists all nearby ePlug devices.
In the list, select and tap a unit to bind and go to the Device Settings page. If the device you click on is bound to another account, the app will have a message to inform you.
Click [Redo], rescan, and update the page. Click [back], go [back] to the Device List page.
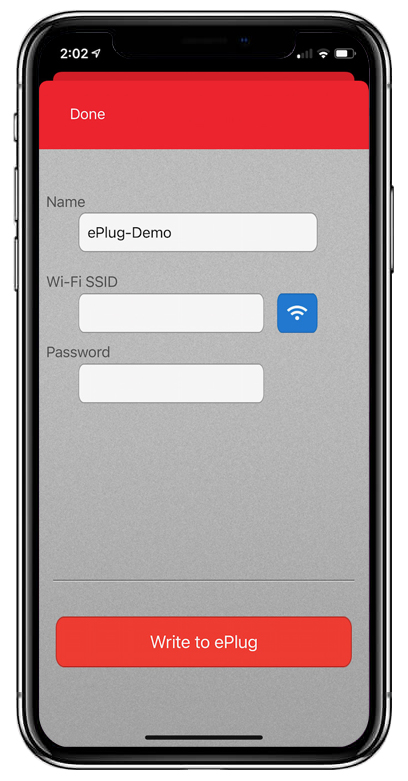
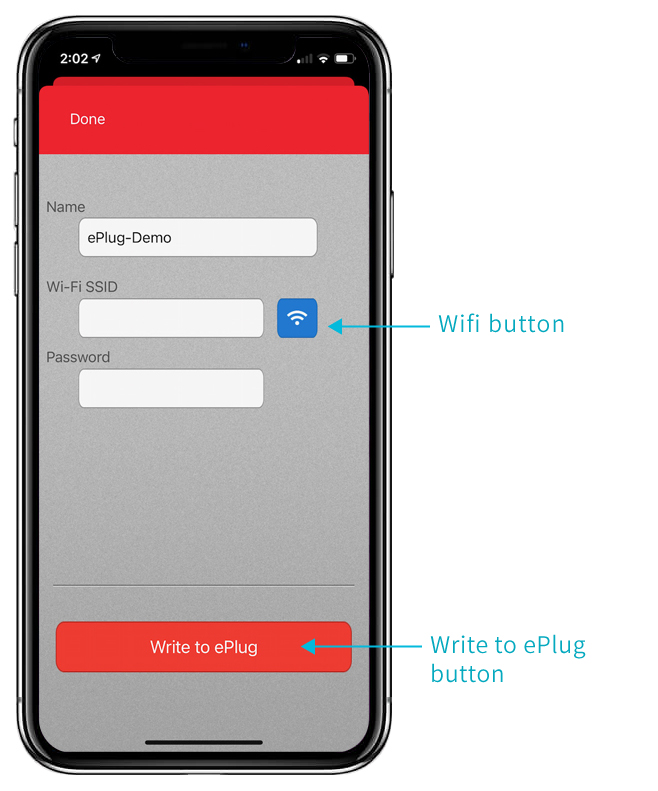
Device Settings
The APP reads the wireless network SSID recorded within the device, along with the device name, and displays it in the Name, and SSID fields.
You can modify the device name, wireless network SSID, and its password. Click the Wifi button to copy the wireless network SSID linked to the phone to the SSID field.
Click on [Write to ePlug] and, upon confirmation, the app will send the information to the device. At this point, the account is bound to the device.
Click on [Done] and go back to the Device List page.
In the device connection, the green LED of the button flashes.
When the device is connected, the green LED of the unit button is constantly lit.
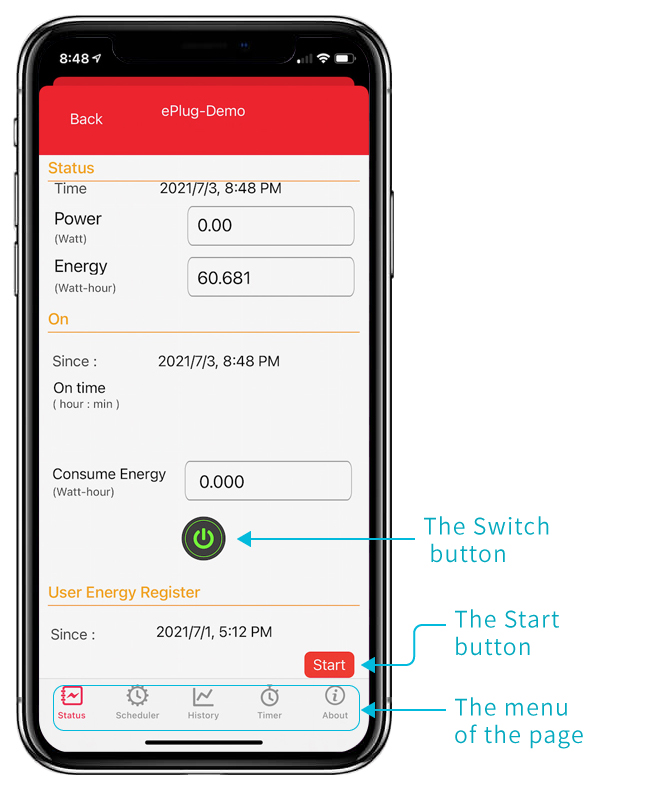
Device Status
The app reads information about electricity consumption in the appliance and displays it in the corresponding field.
Click the [Switch] button and the App sends instructions to turn the device's socket switch on or off.
Clicking on the [Start] button, the device will start accumulating the power data that starts at this time.
Click on the icon in the page menu and go directly to the page represented by the icon.
Click [Back] to go back to the Device List page.
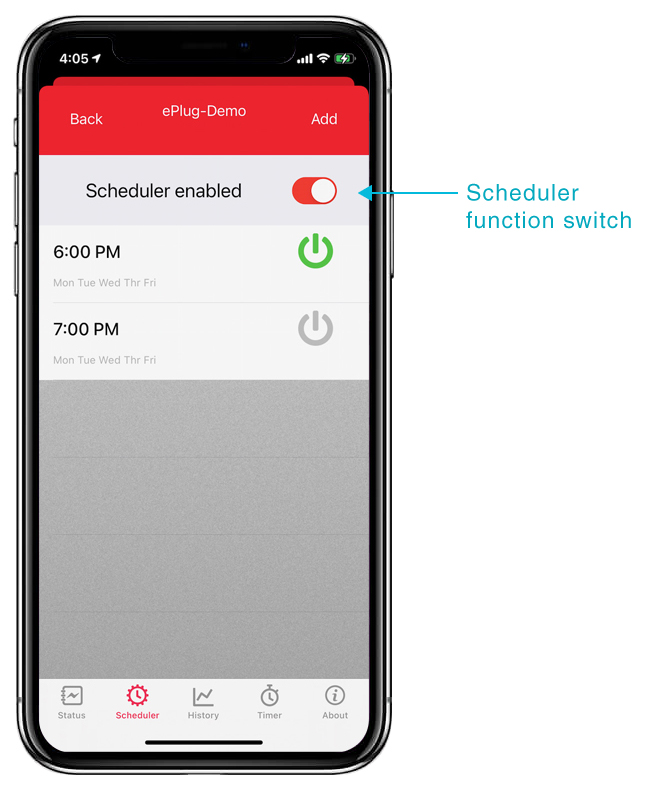
Schedule list
The app sets a list of schedule stored on the device.
Each schedule information contains a set start time and a switch to turn on or off the socket.
To disable the scheduler feature, switch the button for the scheduler function.
To delete a schedule, swipe the schedule from right to left with your finger.
To modify a schedule, select and click the schedule, go to the Add schedule page and modify the schedule profile.
Click on [Add] to go to the Add schedule page.
Click [Back] to go back to the Device List page.
Add schdule
On this page, you can set the time, repeat the date, and turn the switch on or off on the socket.
Once set, click the [OK] button and complete the schedule setting.
Click on [Cancel], and the schedule is not modified at this time, and go back to the Schedule List page.
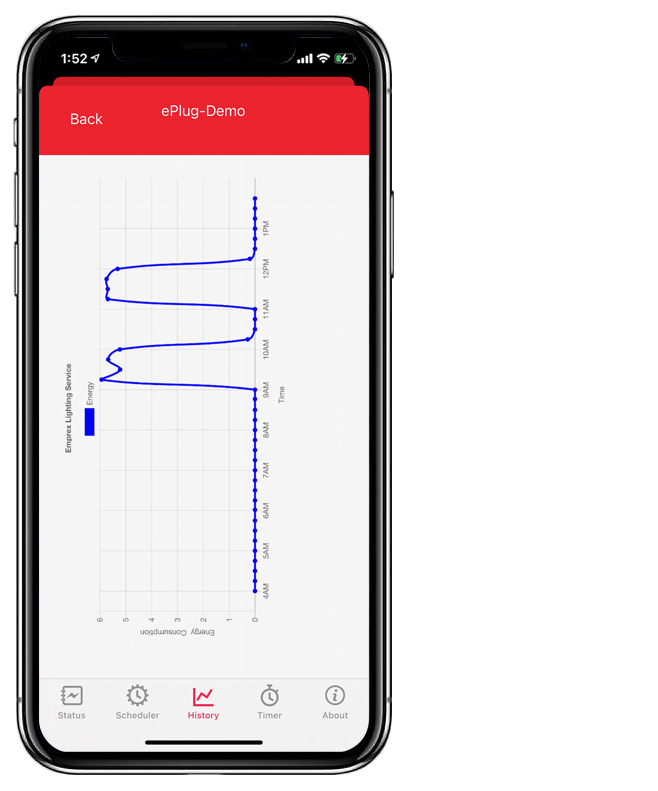
History
The app plots the last 10 hours of electricity usage data.
Click [Back] to go back to the Device List page.
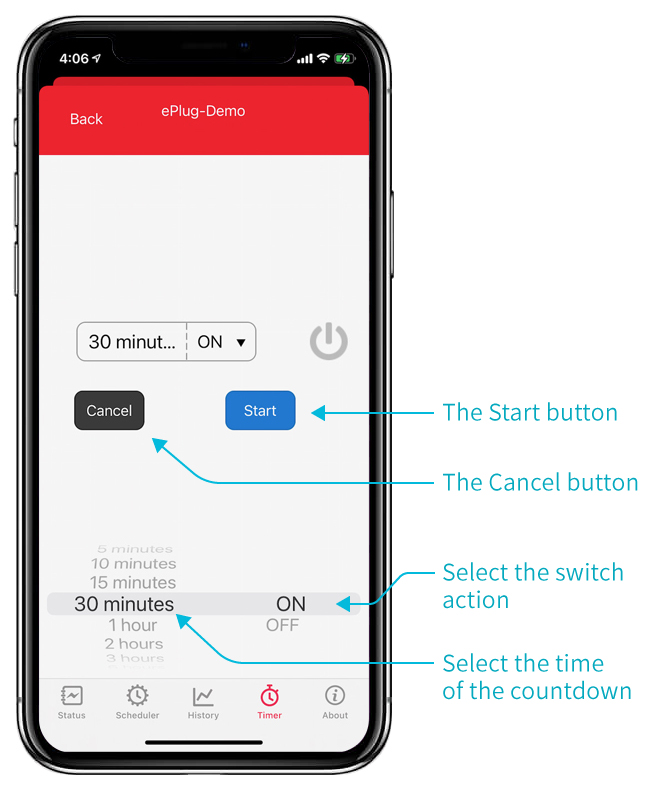
Timer
Select the countdown time and select the switch on or off on the socket.
The icon of the switch shows the current status of the switch on the socket.
When you click the [Start] button, the device starts counting down. When the time comes, the unit controls the switch on the socket according to the action selected.
When the countdown starts, you can pause, continue, or cancel the countdown.
Click [Back] to go back to the Device List page.
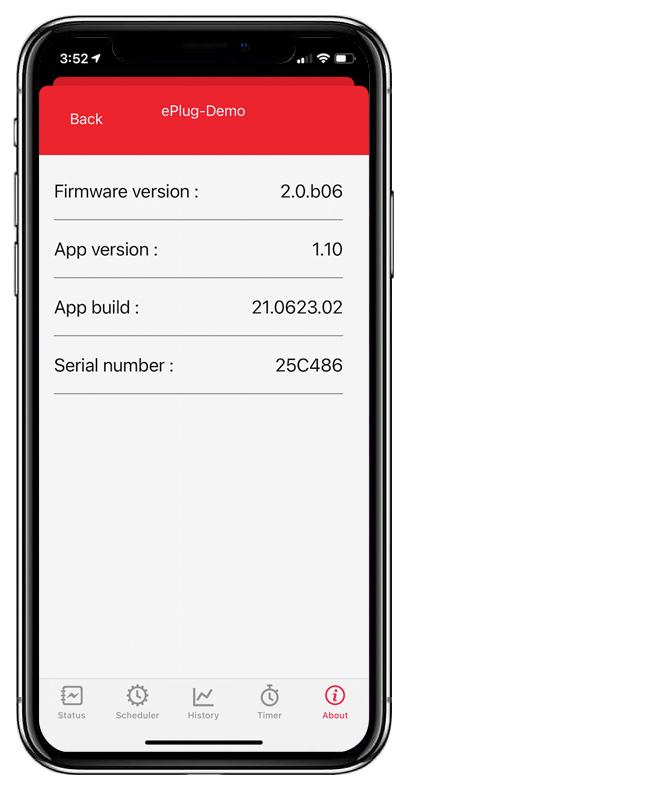
About
App displays, firmware version, App version, App build, and device serial number information.